

***
Please be aware the Ulyaoth Repository has been discontinued! Please read:
https://ulyaoth.com/news/ulyaoth-repository-end-of-life/
You can still make this tutorial work but you will need to compile the packages yourself, please be aware our GitHub is not longer updated however: https://github.com/ulyaoth/repository
***
In this guide I will provide an example of how to set up a Logstash server with a Kibana interface that does get the logs from rsyslog. While there are multiple other ways to get logs into Logstash I will focus in this guide on rsyslog only.
I am aware that in the new Logstash rpm everything such as Kibana is merged into one package, But I feel personally it is better to install things separate as this gives you the possibility to update certain parts when you want without having to wait for a new rpms.
If you are going to use this in a production environment then please make sure to check the security implications of going the rsyslog way as you would need to open a port. So unless you are in an internal network everyone will be able to ship logs to your Logstash server.
So what is Logstash!?:
“Logstash is a tool for managing events and logs. You can use it to collect logs, parse them, and store them for later use (like, for searching). Speaking of searching, Logstash comes with a web interface for searching and drilling into all of your logs.”
There are a lot of examples on the official Logstash so I definitely recommend having a look there!
Their website: https://www.elastic.co/products/logstash
Now let’s start, for this guide I will be using the following programs:
Fedora
Logstash 4
rsyslog
ElasticSearch 4
Nginx
Kibana 4
Step 1: Import the Logstash and Elasticsearch GPG key.
$ sudo rpm --import http://packages.elasticsearch.org/GPG-KEY-elasticsearch
Step 2: Go to your yum repository directory.
$ cd /etc/yum.repos.d/
Step 3: Download the Logstash and Elasticsearch repository files.
$ sudo wget https://raw.githubusercontent.com/sbagmeijer/ulyaoth/master/guides/logstash/repository/logstash.repo

$ sudo wget https://raw.githubusercontent.com/sbagmeijer/ulyaoth/master/guides/logstash/repository/elasticsearch.repo
Step 4: Install the Ulyaoth repository to your server.
$ dnf install https://downloads.ulyaoth.net/rpm/ulyaoth-latest.fedora.x86_64.rpm
If you are using another Fedora or RHEL version please have a look here if your repository is supported: https://community.ulyaoth.com/resources/ulyaoth.2/
Step 5: Install all required packages
$ sudo dnf install -y ulyaoth-nginx ulyaoth-kibana java elasticsearch logstash rsyslog tar wget policycoreutils-python zip
Step 6: Reload the systemd daemon.
$ sudo systemctl daemon-reload
Step 7: Go to the Logstash config directory
$ cd /etc/logstash/conf.d
Step 8: Download the following Logstash config file
$ sudo wget https://raw.githubusercontent.com/sbagmeijer/ulyaoth/master/guides/logstash/rsyslog/logstash.conf
Step 9: Change the ownership of the Logstash config file
$ sudo chown logstash:logstash logstash.conf
Step 10: Create the following directories:
$ sudo mkdir -p /var/log/nginx/kibana
Step 11: Change the owner ship on the kibana nginx log folder.
$ sudo chown nginx:adm /var/log/nginx/kibana
Step 12: wget the kibana vhost file
$ sudo wget https://raw.githubusercontent.com/sbagmeijer/ulyaoth/master/guides/logstash/nginx/vhost/kibana4.conf -O /etc/nginx/sites-available/kibana.conf
Step 13: Open the kibana vhost file
$ sudo vi /etc/nginx/sites-available/kibana.conf
Step 14: Change the site name
Simply change the “logstash.ulyaoth.net” to whatever your logstash url will be and save the file.
Step 15: Symbolic link the vhost file so nginx will load it
$ sudo ln -s /etc/nginx/sites-available/kibana.conf /etc/nginx/sites-enabled/kibana.conf
Step 16: Fix selinux
$ sudo semanage port -a -t http_port_t -p tcp 9200

$ sudo semanage port -a -t http_port_t -p tcp 5601
Step 17: Fix firewalld
$ firewall-cmd --permanent --zone=FedoraServer --add-service=http

$ firewall-cmd --permanent --zone=FedoraServer --add-service=https

$ firewall-cmd --permanent --zone=FedoraServer --add-port=5544/udp
Please be aware that the zone can depend on your setup or os version.
Step 18: Restart firewalld.
$ sudo systemctl restart firewalld.service
Step 19: Put Logstash, ElasticSearch, Nginx and Kibana on autostart.
$ sudo systemctl enable elasticsearch.service

$ sudo systemctl enable logstash.service

$ sudo systemctl enable nginx.service

$ sudo systemctl enable kibana.service
Step 20: Start the services in the order below ie “elasticsearch -> logstash -> nginx -> kibana”.
$ sudo systemctl start elasticsearch.service

$ sudo systemctl start logstash.service

$ sudo systemctl start nginx.service

$ sudo systemctl start kibana.service
If you now go to your website for example for me “https://logstash.ulyaoth.net” you will see something like this:
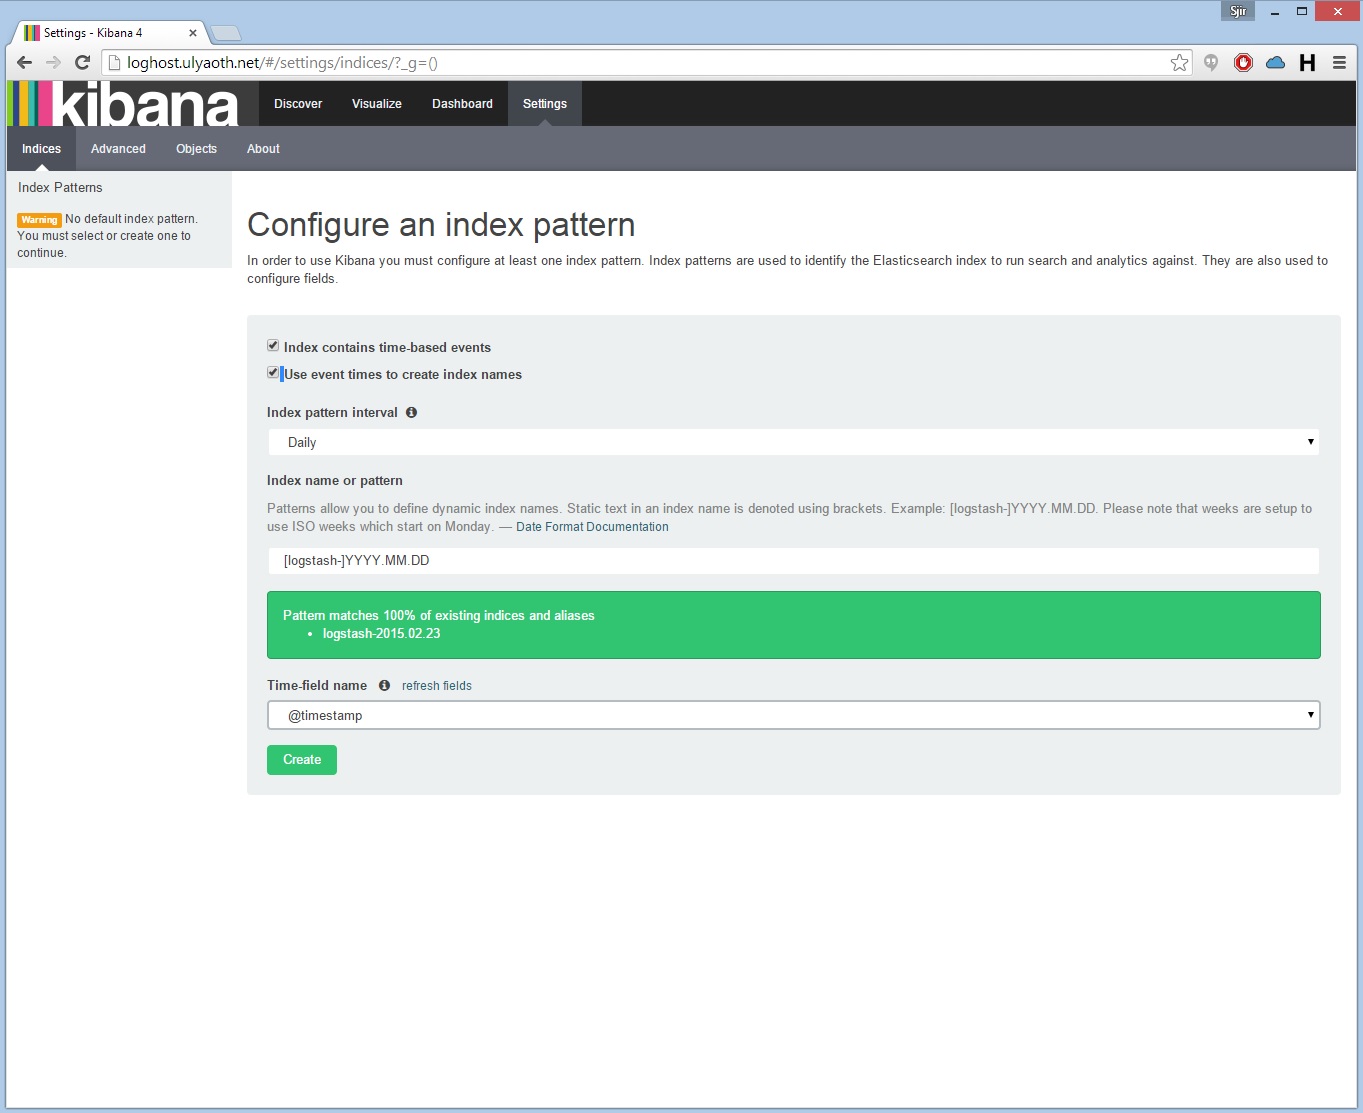
Make sure to choose the same options as I did above and then press on “Create” this will finish the Kibana configuration and you can start using it afterward.
Logstash is a product that is always in development so the screenshot above is outdated probably by now as they keep changing the interface.
This is it everything should be working now 🙂 you should now be seeing something like this if you go to your Logstash website:
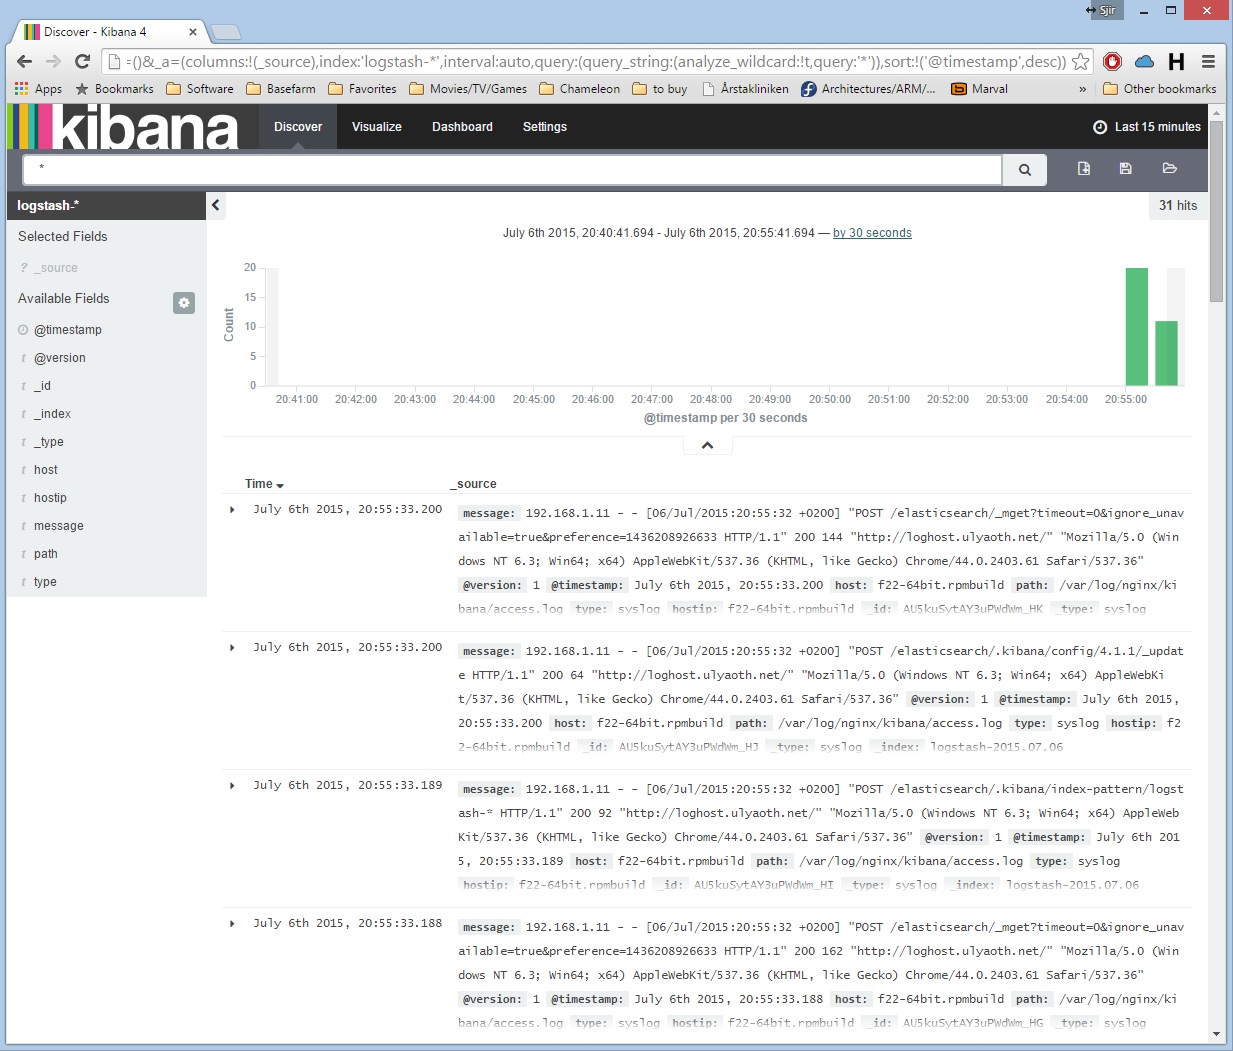
You probably question how come there are already logs, well this is because I added the following config already to the logstash.conf.
file {

type => syslog

path => [ "/var/log/nginx/kibana/*.log", "/var/log/nginx/*.log" ]

}
You can simply remove it or keep it.
You are now ready to ship your logs to port “5544” and they should show up in Kibana! Congratulations!
*problems that could occur*
There is a bug in Logstash currently that it can only handle utf8 if your log is different then this it will crash Logstash a workaround is as you can see above to add the following:
codec => plain { charset => "ISO-8859-1" }
I hope this guide has helped you.